Basic Tuning
Bow tuning
is adjusting the bow to the archer's style of shooting to achieve the best
performance and achieve the best arrow flight.
Tuning the bow and arrow setup go hand in hand with the archer's shooting
style.
To get the most from bow tuning the archer's shooting style must be
consistent.
There
are four main variables that effect bow performance:
Each of these will be explained in more detail below. Click here to see a diagram of a bow with labelled parts.
 Bowstring
Materials
Bowstring
Materials
See here for a guide to bowstrings.
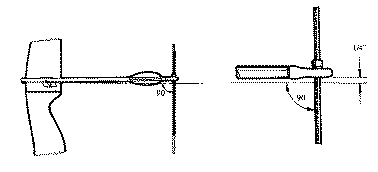
Brace Height Tuning

Brace Height is measured from the centre of the bow grip to the bowstring at 90
degrees.
Most bows will have a recommended given by the manufacturer.
If the brace height is not known, then a rough guide for recurves is:
- 70 inch bow = 8.50 to 9.75 inches
- 68 inch bow = 8.25 to 9.50 inches
- 66 inch bow = 8.00 to 9.25 inches
- 64 inch bow = 7.75 to 9.00 inches
The ideal brace height for a bow is one that produces the quietest release
with the least amount of vibration in the bow.
Step 1
Set the brace height at the
bow manufacturer's recommended minimum.
A slightly longer bowstring may
have to be used as the bowstring must still have enough twists in it to
keep it round.
Step 2
Shoot a few ends of arrows at close range and
note how the bow performs.
Step 3
Increase the brace height by putting 5 more
twists in the bowstring.
Make sure to twist in the same direction as this will shorten the
bowstring. Also check and adjust the nocking point position.
Step 4
Shoot another few ends of arrows and note how
the bow performs.
Step 5
Repeat these steps until the recommended
maximum brace height is reached.
Step 6
Somewhere between the minimum and maximum
heights, the bow should perform at its quietest and with least vibration.
Where it does this, is the ideal brace height for the bow with this
particular type of bowstring. Keep a record of this brace height for
future reference.
To help your shooting, the
brace height must remain consistent. Any variation in distance will effect
the arrow flight, so always check the brace height before shooting.
Bowstrings stretch over time or broken strands can lower the brace height.
Arrow Nocking Point
To obtain
correct arrow flight, a point on the bowstring must be found at which the
force from the bowstring acts directly inline with the arrow.
A starting point is generally somewhere between 3 to 10mm (1/8th to 3/8th
inches) above 90 degrees to the arrow rest.
This position is due to using two fingers below the arrow and one finger
above the arrow to pull the bowstring
and seeking to find the balance
point of the forces on the bowstring.
Step 1
A quick
way to tune a Nocking Point location is to use the 'Paper
Tuning' method.
A frame is placed about 2 metres (6 feet) in front of the target.
A sheet of paper is placed taut over the frame.
The archer then stands about 1 metre (3 feet) in front of the frame and
shoots the arrows through the paper.
From the direction of the tear in the paper, the nocking point can be
adjusted.
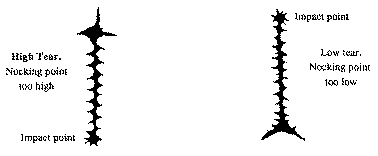
The paper tear
on the left indicates that the nocking point is too high.
The paper tear on the right indicates that the nocking point is too low.
Step 2
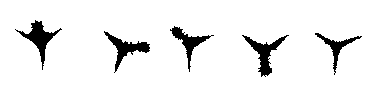
Adjust the nocking point location indicated by the direction of
the paper tears above.
Shoot through a new sheet of paper and check the direction of the paper
tears.
Keep repeating until the smallest paper tears are achieved.
Acceptable paper tears are shown in the picture at left, as perfect paper
tears may not be possible due to other factors.
Step 3
Note the exact nocking point location for future reference.
Always check your nocking point location before shooting.
If you can't get the paper tears to look like those
above, it may be that your arrows are 'under-spined' - too small for the draw weight
of the bow.
Pressure Button
Pressure
buttons usually come with three different insert springs - a soft spring, medium spring and hard spring.
For tuning, it is best to start with the medium spring and adjusting the
thread to the rear of the spring to about half way in.
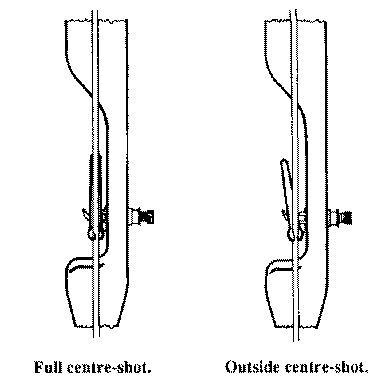
Adjust the 'Centre-Shot' position of the arrow on the arrow rest by
winding the plunger button into or out of the riser.
To do this, nock the arrow on the bow, then looking from the rear of the
arrow, align the bowstring with the centre of the top and bottom limbs,
then check the alignment of the arrow shaft to the bowstring.
For bows shot with fingers, the correct alignment should be 'Outside
Centre-Shot' position.
Only the diameter of the arrow at the point should be to the left of the
bowstring.
The reason for this position is to counter-act the slight sideways motion
of the bowstring on release from the fingers.
The 'Full Centre-Shot' position should only be used for compound bows shot
with release aids.
To align 'Full Centre-Shot' on a compound bow, align the bowstring with
the top and bottom wheels, then align the arrow shaft with the bowstring.
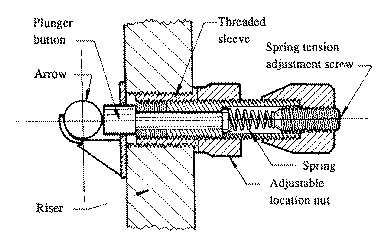
A pressure button can be used when the bow riser has a threaded
sleeve fitted.
The arrow rest has to be adjusted so that the centre of the arrow and the
centreline of the pressure button align.
The pressure button has two purposes:
- The first is to adjust the horizontal position of the arrow as it sits on
the arrow rest to achieve 'centre shot'.
- The second is to absorb the initial bend of the arrow as it is released by
adjusting the amount of spring pressure on the plunger button.
These adjustments will achieve straighter arrow flight when the bow is
'tuned'.
